Yaohong

为了真相不惜被羞辱

How does warp Perspective work?

How does warp Perspective work?

1.warp perspective with cv2

if __name__ == "__main__":
    # coordinate: (y,x), left_top, right_rop, left_bottom, right_bottom
    src = np.float32([[20.0, 0.0], [20.0 ,315.0], [186.0, 17.2], [181.0, 299.0]])
    dst = np.float32([[0.0, 0.0],  [0.0,  315.0], [202.0, 7.0], [200.0, 306.0]])

    # load image
    warp_img = cv2.imread("./my_wide_angle_orig.jpg")
    warp_img = cv2.cvtColor(warp_img, cv2.COLOR_BGR2RGB)
    print("warp_img: ",warp_img.shape) # (638, 958, 3)
    width = int(warp_img.shape[1]/3)
    height = int(warp_img.shape[0]/3)
    warp_img  = cv2.resize(warp_img, (width,height), interpolation=cv2.INTER_LINEAR)
    print("warp_img.shape:",warp_img.shape) # (212, 319, 3)

    ## orig image
    plt.subplot(121),
    plt.title("warp_img")
    plt.imshow(warp_img)

    # cv2 warp perspective
    cv2_matrix = cv2.getPerspectiveTransform(src, dst)
    print("cv2_matrix:\n",cv2_matrix)
    cv2_fix_img = cv2.warpPerspective(warp_img, cv2_matrix, (width,height))
    plt.subplot(122),
    plt.title('cv2_fix_img')
    plt.imshow(cv2_fix_img) 
    plt.show()

2.Implement it in our way

Step1 calculate warp matrix:

my_warp_matrix reshape:
 [[ 1.13729359e+00 -8.24289989e-18 -2.27458717e+01]
 [-6.10786436e-02  9.69843448e-01  1.22157287e+00]
 [-3.44743207e-04 -7.38466280e-05  1.00000000e+00]]

Step2. use the warp matrix to warp perspective

codes are:


Differences On Numpyp.Floor And Python Int method.md

Differences On Numpyp.Floor And Python Int method.md

numpy.floor Return the floor of the input.

The floor of the scalar x is the largest integer i, such that i <= x;

np.floor() will not change its data type;

Example:

import numpy as np

tmp_list = list([-3.3, -2.22, -1.56, -0.56, 0.56, 1.56, 2.22, 3.33])

tmp_list = np.array(tmp_list)
print("type(tmp_list[0]):", type(tmp_list[0]) )
print("type(np.floor(tmp_list)[0]):",  type(np.floor(tmp_list)[0]) )
print("np.floor(tmp_list):", np.floor(tmp_list))

# Output:
# type(tmp_list[0]): <class 'numpy.float64'>
# type(np.floor(tmp_list)[0]): <class 'numpy.float64'>
# np.floor(tmp_list): [-4. -3. -2. -1.  0.  1.  2.  3.]


for x in tmp_list:
	print("x:",x,",int:",int(x)) 

# output:
# x: -3.3 ,int: -3
# x: -2.22 ,int: -2
# x: -1.56 ,int: -1
# x: -0.56 ,int: 0
# x: 0.56 ,int: 0
# x: 1.56 ,int: 1
# x: 2.22 ,int: 2
# x: 3.33 ,int: 3

For floating point numbers, int() will truncates toward zero, so -0.1 will by truncate to 0, -1.8 to -1; And its data type will be changed to <class 'int'>.


How does numpy add two arrays with different shapes?

How does numpy add two arrays with different shapes?

Numpy has a add method which add two numpy array.

Arithmetic operation + does the same thing as Numpy.add;

1.Add a same shapes array

Let’s see a example.

import numpy as np

list1 = np.array([1, 2, 3]);
list2= np.array([10, 20, 30]);

print("list1:",list1,"list2:",list2);
# Print: list1: [1 2 3] list2: [10 20 30]

added_list = list1 + list2;
print("added_list.shape:",added_list.shape,"\nadded_list:",added_list);
# Print:
# added_list.shape: (3,) 
# added_list: [11 22 33]

added_list = np.add(list1, list2);
print("added_list.shape:",added_list.shape,"\nadded_list:",added_list);
# Print:
# added_list.shape: (3,) 
# added_list: [11 22 33]

2.Add a different shape array

But what happen if two array have different shapes?


Understanding Transpose

Understanding Numpy Transpose

1.Transpose is to switch the row and column indices of the matrix A;

x = np.arange(8).reshape((4,2))
print(x)
print(x.T)
# output:
# [[0 1] # x
#  [2 3]
#  [4 5]
#  [6 7]]
# [[0 2 4 6] # x.T
#  [1 3 5 7]]

x = np.arange(9).reshape((3,3))
print(x)
print(x.T)
print(x.shape, x.T.shape)
# output:
# [[0 1 2]
#  [3 4 5]
#  [6 7 8]]
# [[0 3 6]
#  [1 4 7]
#  [2 5 8]]

x = np.arange(8).reshape((2,4))
print(x)
print(x.T)
# output:
# [[0 1 2 3]
#  [4 5 6 7]]
# [[0 4]
#  [1 5]
#  [2 6]
#  [3 7]]

If the array has only one dimension, the transpose of the array will not change;


Understanding Numpy expand_dims

Inserting 1 into the shape brackets base on the axis value

Understanding Numpy expand_dims

Shape (n,)(n is a number) means it has only one dimension.

The number of values is shape brackets represents the number of dimensions.

import numpy as np
arr = np.array([1,2,3,4,5]);
print("arr shape: ",arr.shape)
print("arr shape: ",arr)
arr2 = np.expand_dims(arr, 0);
print("expand_dims axis=0, shape:",arr2.shape)
print("expand_dims axis=0, arr2:",arr2)
arr2 = np.expand_dims(arr, 1);
print("expand_dims axis=1, shape:",arr2.shape)
print("expand_dims axis=1, arr2:",arr2)

output:

arr shape:  (5,) 
arr shape:  [1 2 3 4 5]
expand_dims axis=0, shape: (1, 5)
expand_dims axis=0, arr2: [[1 2 3 4 5]]
expand_dims axis=1, shape: (5, 1)
expand_dims axis=1, arr2: [[1]
 [2]
 [3]
 [4]
 [5]]

numpy.expand_dims

expand_dims looks like inserting 1 into the shape brackets base on the axis value;


Sed

Sed

sed is a steam editor. sed treats multiple input files as one long stream.

The full format for invoking sed is:

sed OPTIONS... [SCRIPT] [INPUTFILE...]

Some common OPTIONS:

-n to suppress output, sed -n '45p' file.txt this command prints only line 45 of input file;

-e options are used to specify a script expression, such as sed -e 's/hello/world/' input.txt > output.txt;

-f specify a script file, such as sed -f myscript.sed input.txt > output.txt


Simple Tree command

Simple Tree command

Using the follow command can view current folder tree:

find . -print| sed -e 's;[^/]*/;|____;g;s;____|; |;g'

output

$ find . -print| sed -e 's;[^/]*/;|____;g;s;____|; |;g'
.
|____composer.lock
|____LICENSE
|____README.md
|____.gitignore
|____build-phar.php
|____.git
| |____config
| |____objects
...

Below command only descend at most 2 directory levels:

find . -maxdepth 2  -e -print | sed -e 's;[^/]*/;|____;g;s;____|; |;g'

REFERENCE

Using a Mac Equivalent of Unix “tree” Command to View Folder Trees at Terminal


Quickly host your hugo web on Gitlab

Quickly host your hugo web on Gitlab

Quickly host your hugo web on gitlab.

1.Login gitlab

Gitlab

2.click new project after login

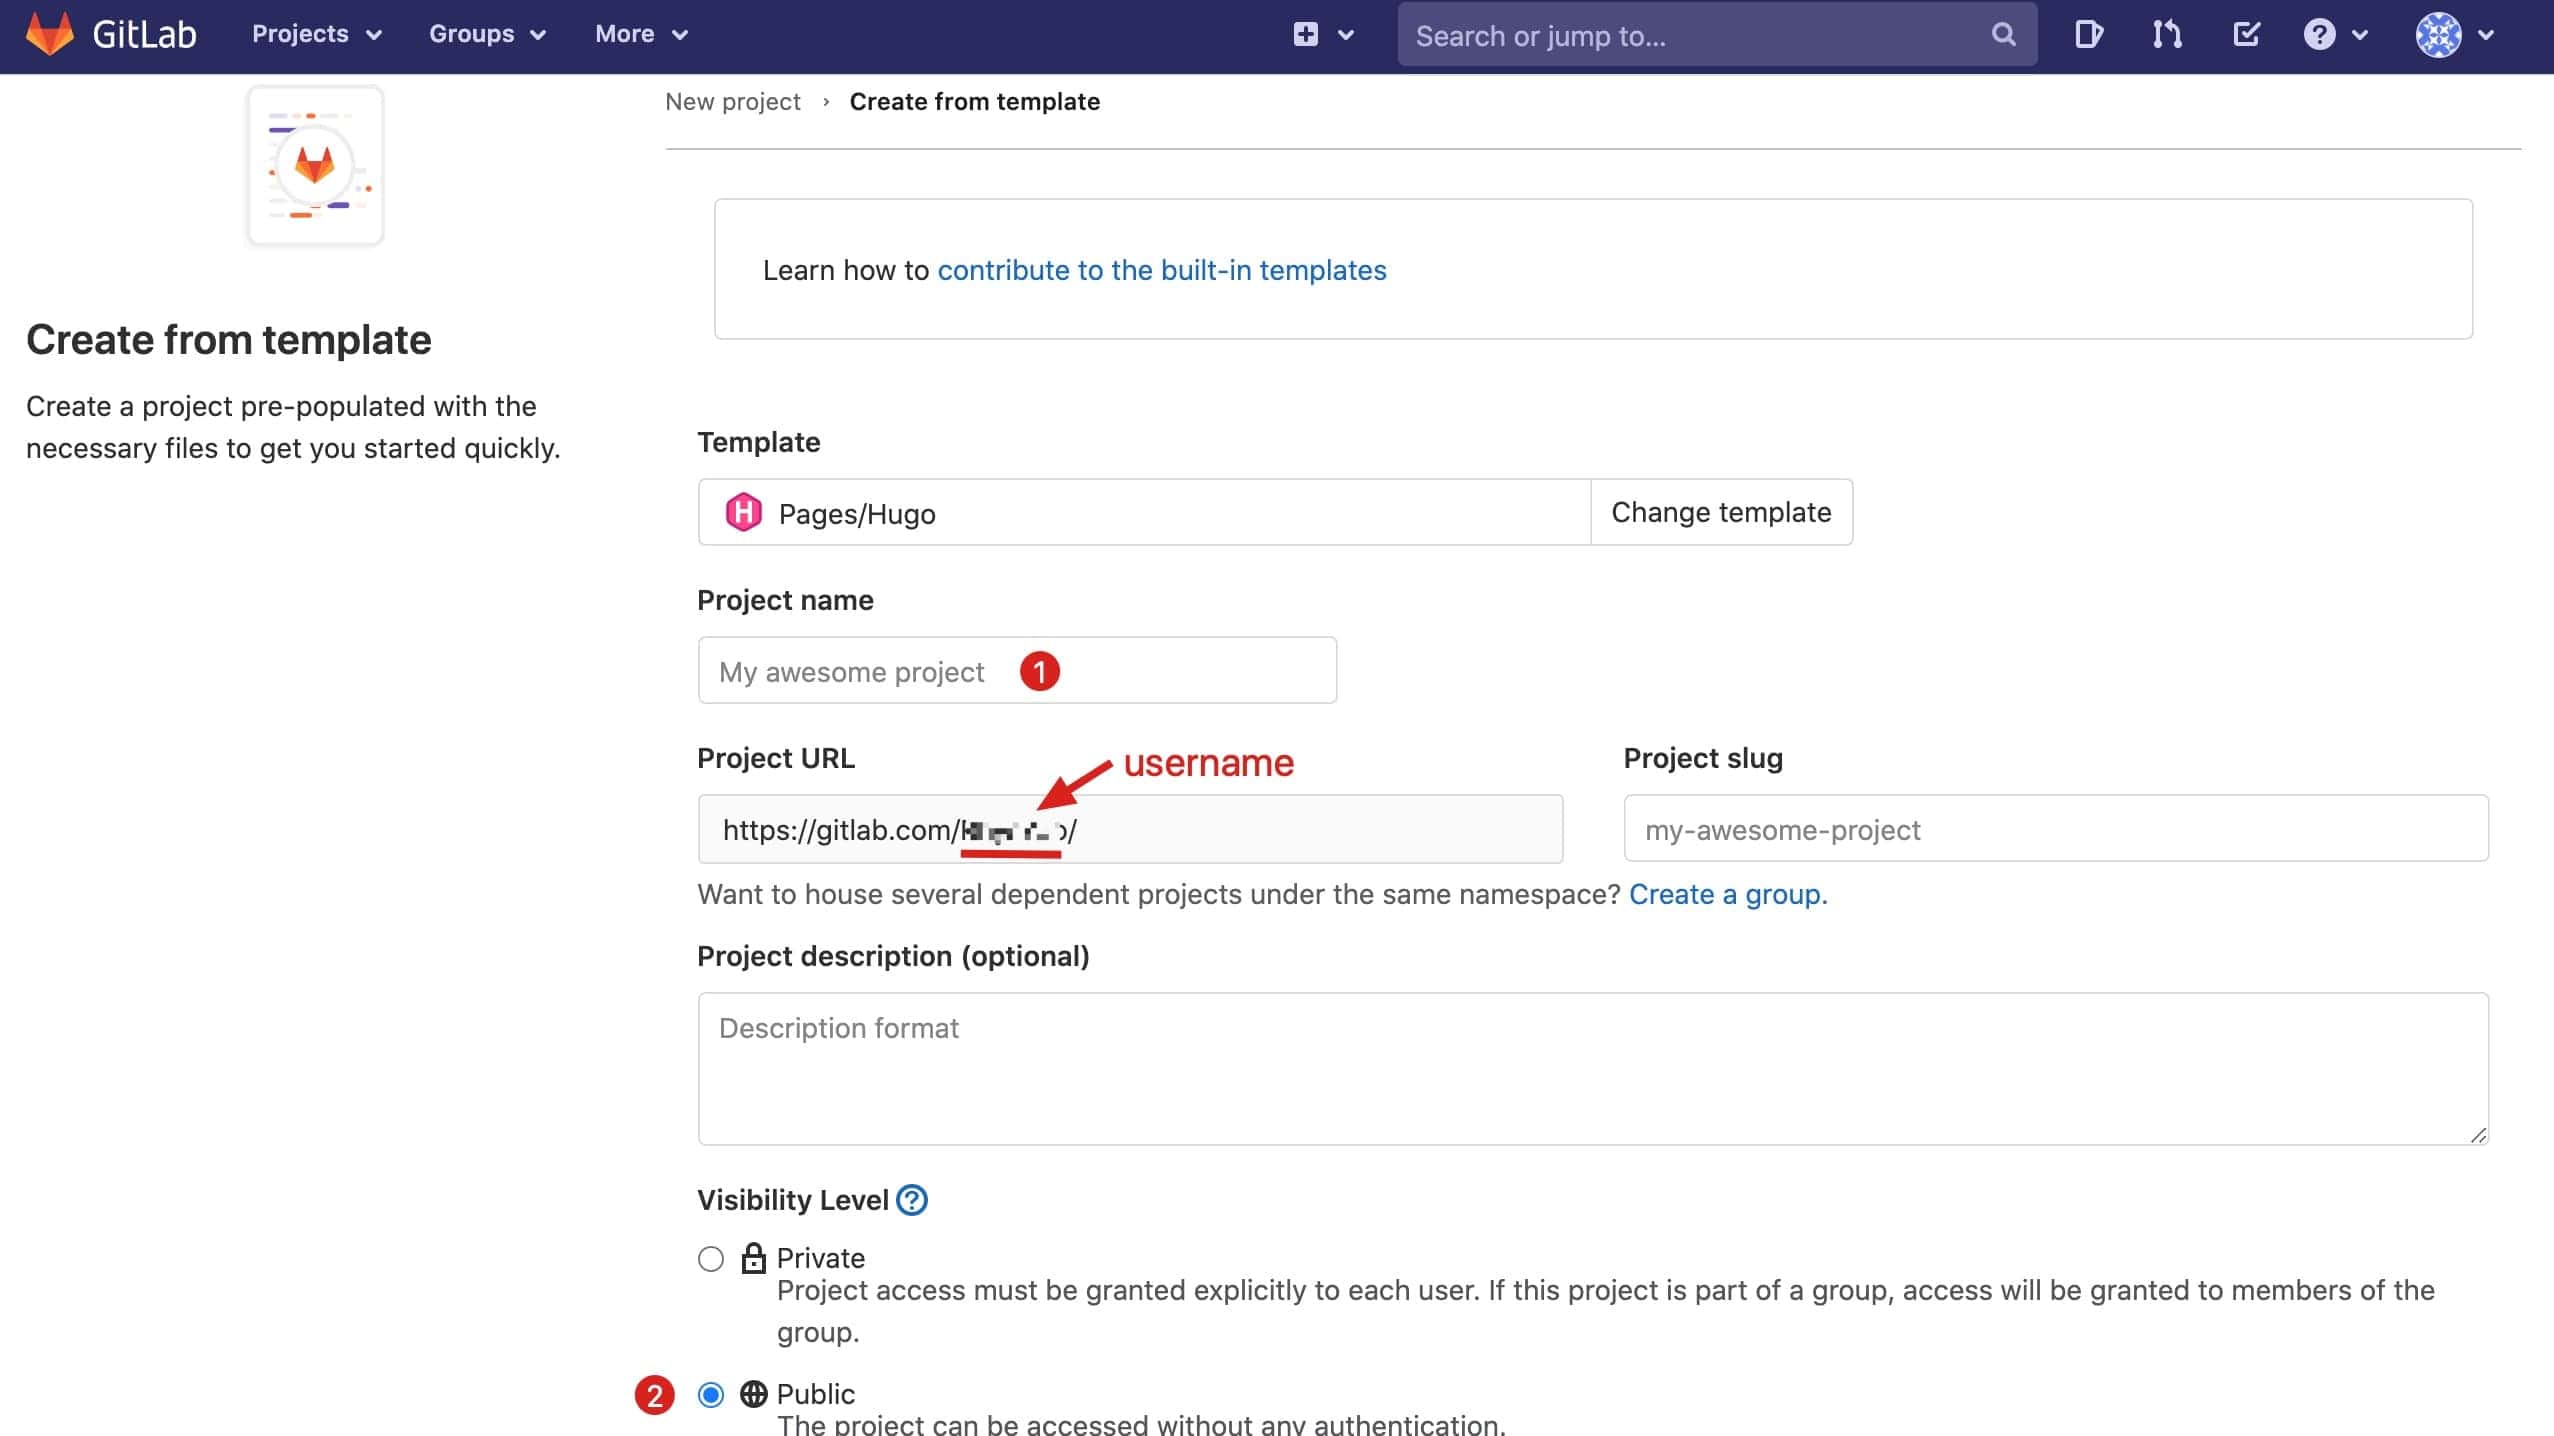
Click Create from template in Create new project and use “Hugo template”

Gitlab

In this example, my project name is: testPage

Now you can see your username on Project URL, for example, mine is https://gitlab.com/RhysYao/, and username is RhysYao which will be used later.

Create from template on Gitlab